Are you using Mac for the first time and don’t have an idea how to take a screenshot on your Mac?
Table of Contents
or
maybe using Mac for a long time but never felt the need of taking screen before?
if this is so, you aren’t alone.
There are many people including me who buy certain products just to perform the basic tasks, I’m sometimes too lazy to explore all the features that a particular product may perform.
Anyways…
If you have landed on this website, you must be searching for ways to take a screenshot on your Mac.
If this is so, you have come to the right place…
As I said above, you have probably been using Mac for a very long time but always used it to perform tasks such as checking emails, making slides in the keynote, using Numbers for calculations, etc.
You might haven’t had the need of taking a screenshot on your Mac.
So you haven’t explored this topic before.
Well, don’t worry if you haven’t explored it before…
…because today in this article, I’ll guide you to take a screenshot on Mac in different ways.
There are several ways and I’ll list them all in this article, you can choose one based on your preference.
Also see: How to get Xcode for Windows
Whether you want to capture a moment from a video that you shot while you were on a fun tour with your family or need to take a screenshot of an important document that you want to keep for your record, the below shortcuts will make this task super easy.
It is my habit whenever I do any transaction online through my credit card or through online banking after the transaction is completed, I always prefer to take a screenshot of this page so that I’ve got the reference number and other details of this particular transaction for my records.
I had to argue with the customer executive of this insurance company for several hours before they finally sorted out the issue I had raised.
I had to renew my car insurance online.
After filling in all the information and making the payment, like a bad habit (being sarcastic) I took a screenshot of the completed transaction that has the reference number of the transaction.
You can trace the transaction (payment made) with this transaction number.
I was sure the payment has been made and my car insurance has been renewed but in a few hours, I received a call from the insurance company that I haven’t completed the transaction (payment).
I argued with this lady over the phone and gave her a transaction ID.
In some time, they traced the payment and finally got to know I’d made the payment and my insurance got renewed.
Phew !! It was too much for a dead-simple task.
I am sure if I had no detail of this transaction, this matter wouldn’t get resolved easily.
So make sure such things don’t happen to you, always take a screenshot. Anyways let’s get to the topic without wasting more time.
Take a screenshot of the entire screen
So the requirement of taking a screenshot could vary.
Sometimes you want to take a screenshot of the entire screen and other times you want to capture just a small portion of the screen.
In this method, I’ll show how to take a screenshot of the entire screen.
It will capture everything you have on your screen and save the file on your desktop in a format that I’ll discuss below.
You can click that saved file to open and further edit.
Check out.
Step: 1 – Open the documents or video or a photograph or everything & anything else you want to include in this screenshot.
Whatever is seen on your desktop screen will get captured in the screenshot in this method.
Make sure the speakers are not muted.
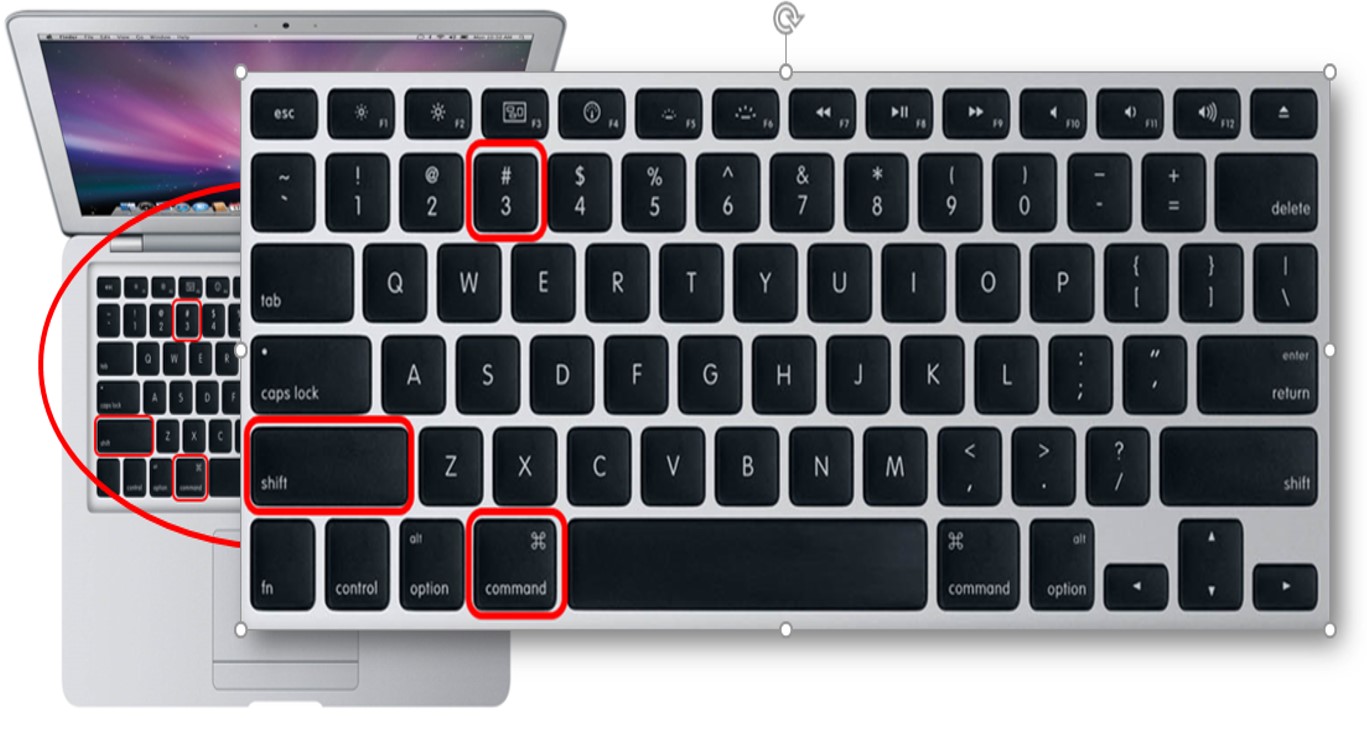
Step: 2 – Press Shift + Command + Number key 3 together.

Step: 3 – Since your speaker is not muted, you will hear some clicking sound that confirms the screenshot has been taken.
By default, the screenshot is saved on the desktop and the format will be similar to Screen shot 2017-06-27 at 02.45.00 PM.png. The screenshot is saved in .png format.
Step: 4 – Now you can double-click the file which just saved on your desktop if you want to view or edit it further.
Wasn’t it easy?
How to screenshot partially
This method is good if you want to capture the screen partially or even completely.
You will have the flexibility to increase or decrease the area you want to take a screenshot of.
Once you press the keys that I’m going to disclose below, you have the option to select the area you want to capture.
Take a look.
Step: 1– Again open the app or documents you want to take a screenshot of.
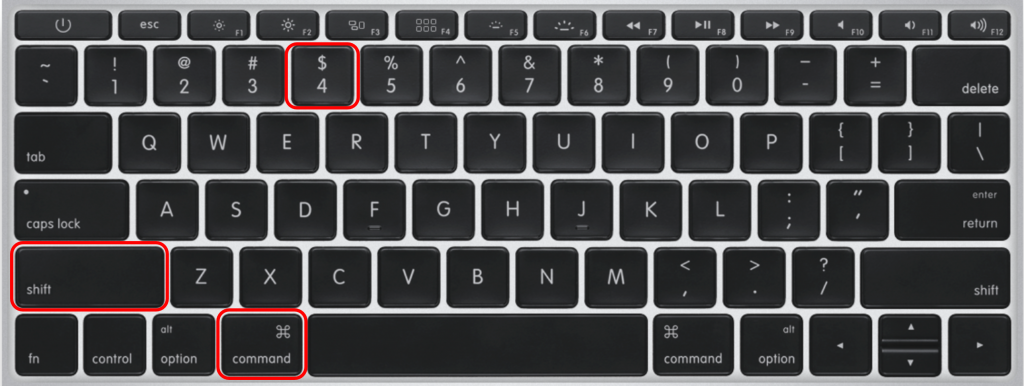
Step: 2– Press Shift + Number key 4 + Command together.
 Step: 3– Once you press the above keys, the cursor will turn into a crosshair. Now you can take crosshair to anywhere (for example on the left top corner) on the screen you want to start a screenshot from.
Now click and hold and move the crosshair to the other end and release the mousepad’s click.
Step: 4– Just like in the above method, you will hear a clicking sound and the screenshot will be saved on the desktop on your Mac.
It will be saved in .png format and the naming of the file would be like Screen shot 2017-06-27 at 02.45.00 PM.png (same as in the above case).
Step:5 – Double-click the saved file to further edit it.
How to take Screenshots in the clipboard
In the above two methods, the screenshot you have taken is automatically saved on the desktop in .png format and with a pre-defined naming format for easy recognition.
In case you don’t want to save screenshots taken automatically on your Mac’s desktop, you can follow this method.
This method will take a screenshot in the clipboard and you can paste it into your favorite image editor.
Step:1 – Set your desktop just as you want to see in the screenshot.
Step:2 – Press Shift + Command + Numeric key 3 (or 4 if you want to select area) + Control altogether.
Step:3 – You will hear a clicking sound which assures you the screenshot is taken and copied to the clipboard.
Step:4 – Open your favorite image editor and press Command + V. The screenshot taken will appear on your image editor. Now you can edit this image.
Weren’t all these methods easy?
You can choose the one that you find suitable.
Share this article with your friends on Facebook, Twitter & Google Plus if it was helpful to you