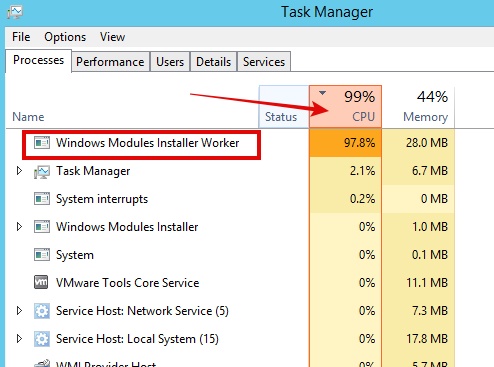
If you using Windows 10, you probably have noticed that the windows modules installer is using a lot of CPU leaving no room for the execution of other processes and applications.
Table of Contents
You’re certainly not alone, most Windows 10 users face this problem.
You’ve arrived at the right place if you want to fix the windows modules installer worker problem.
I’ve written several articles to fix the various errors that we encounter in due course while using Windows laptops or PC.
Among them, the articles to fix errors like Windows installation encountered unexpected error , Service host superfetch , Whea Uncorrectable Error, System Service Exception are the most popular ones.
In this article, I’ll discuss yet another common problem that has become more common nowadays, ie. Windows modules installer worker.
You’ll learn what is this error all about and the workaround to fix this issue.
If it happens occasionally, one can ignore it but if it starts to happen more often, it affects the performance of your computer.
Sometimes, it may freeze your computer for a few seconds or minutes. It is because, when this program runs, your PC utilizes 100% disk and other resources that slow down the PC.
This article is a detailed guide to fixing the Windows modules installer worker issue on your Windows 10/8 computer.
What is the Windows modules installer worker (TiWorker.exe) and what is caused due to?
The windows operating system is going advanced day by day. With every new update, you’ll see some exciting features being added to the operating system.
Also, the company works on fixing bugs with new updates that the users encounter as they use the machine.
So windows updates are an ongoing process and you must install all the new updates whenever it comes.
Windows modules installer (TiWorker.exe) plays an important role in keeping your PC updated on the latest changes.
Windows Modules installer is a windows process that helps with checking, modifying, and uninstalling windows updates.
This service keeps running in the background and looks for the latest updates.
So if you notice that the PC’s fan is spinning a bit faster, you’ll find the Windows modules installer process is running in the background.
Sometimes, during this process, it consumes so many resources, that you’ll notice 100% disk usage that slows/ freezes down the PC.
While this process is known by the Windows modules installer, the file name is generally TiWorkers.exe which you can find under the “Process” tab of the “Task Manager“.
You access the Task Manager by pressing ALT+CTRL+DEL.
Should I disable this service?
Some people advise disabling the Windows modules installer worker (TiWorker.exe) which is not good.
You should never disable this service as the company keeps on releasing new updates to fix bugs. It is a must-have service for security reasons as well.
However, although we do not recommend disabling completely, you can stop the PC from automatically installing the updates.
You can turn the settings to manual so that you can choose your time to look for the updates (if any) and install them as per your preferred timing.
How could you change it to manual? check out the below methods!
METHODS
Change Windows Update to Manual
As the Windows modules installer worker service automatically installs the update whenever any new update is available, it results in high utilization of the CPU.
This situation could be avoided if you either completely disable the Windows update or change it to manual.
As we said, windows updates should be installed whenever any new update comes, disabling it completely is not the right choice.
However we can change Windows Update to manual so that you can check and install the updates whenever you want.
Follow these steps to change Windows Update from Automatic to Manual!
Step:1– Press Windows + R on the keyword.
Step:2– Type services.msc and hit Enter.
Step:3– It will open the Services (Local) Tab. Scroll down to find “Windows Update“
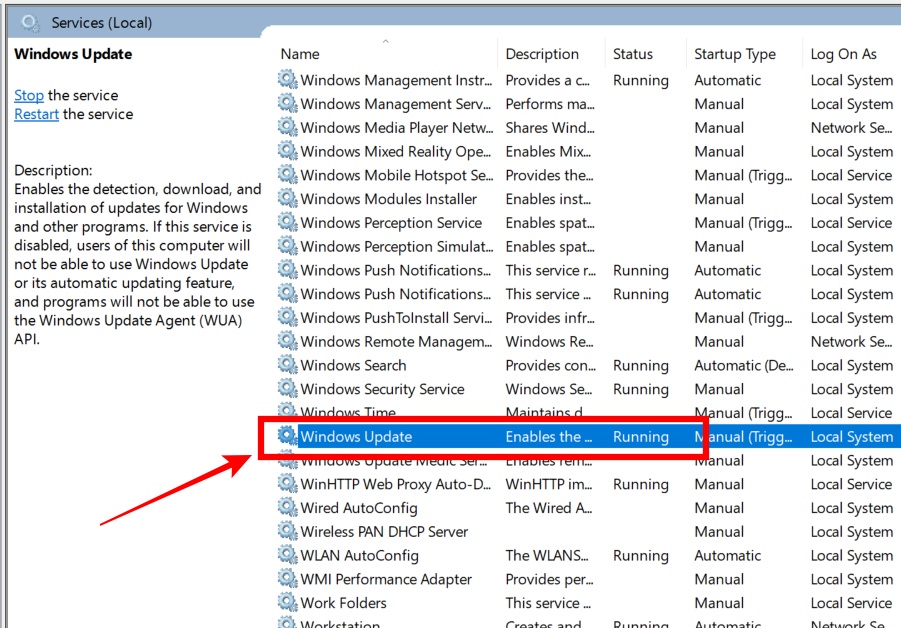
Step:4– Double-click the Windows Update and you’ll be able to see the Properties. You can access the Properties by right-clicking the Windows Update and selecting “Properties“
Step:5– Under the “General” Tab, change the Startup type from Automatic to Manual. Click “Apply” and then “Ok“
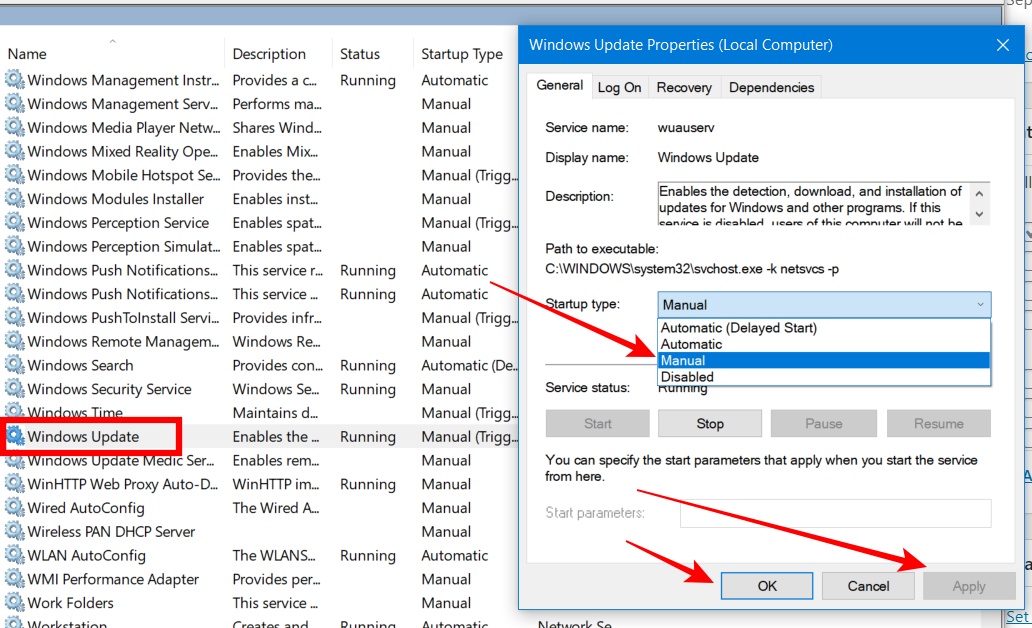
As the Windows update is changed to the manual, any update will not be automatically installed on your PC.
You can choose to check for the updates manually and install the update if you want to.
How to install updates now?
Since the automatic Windows update is disabled, how will your PC will look for the latest updates and install them these updates should be installed to keep your PC secured and updated to the latest version.
Here is how to do it.
1– Click on the Windows Logo from the Start Menu and then the Gear icon.
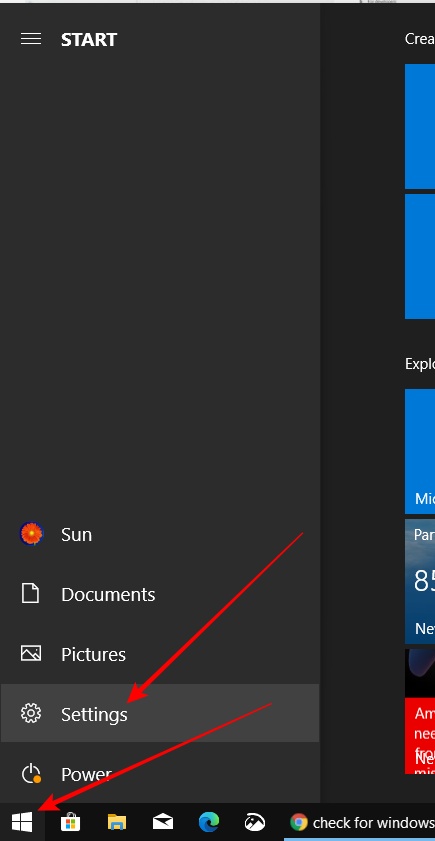
2– Go to “Update & Security” at the bottom.

3– Click “Windows Update” from the left-hand side menu and you’ll see a button to check for updates. Click this button and the windows will check for the updates (if any).
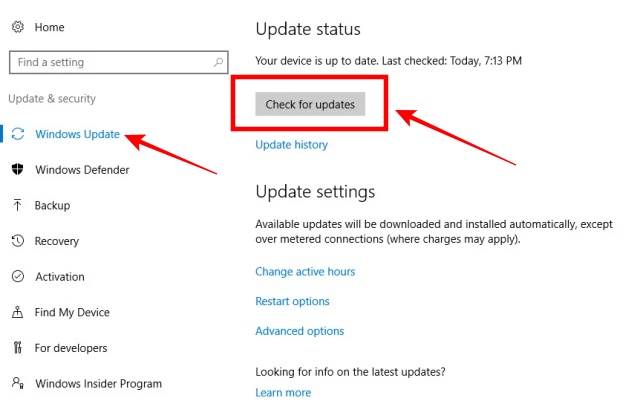
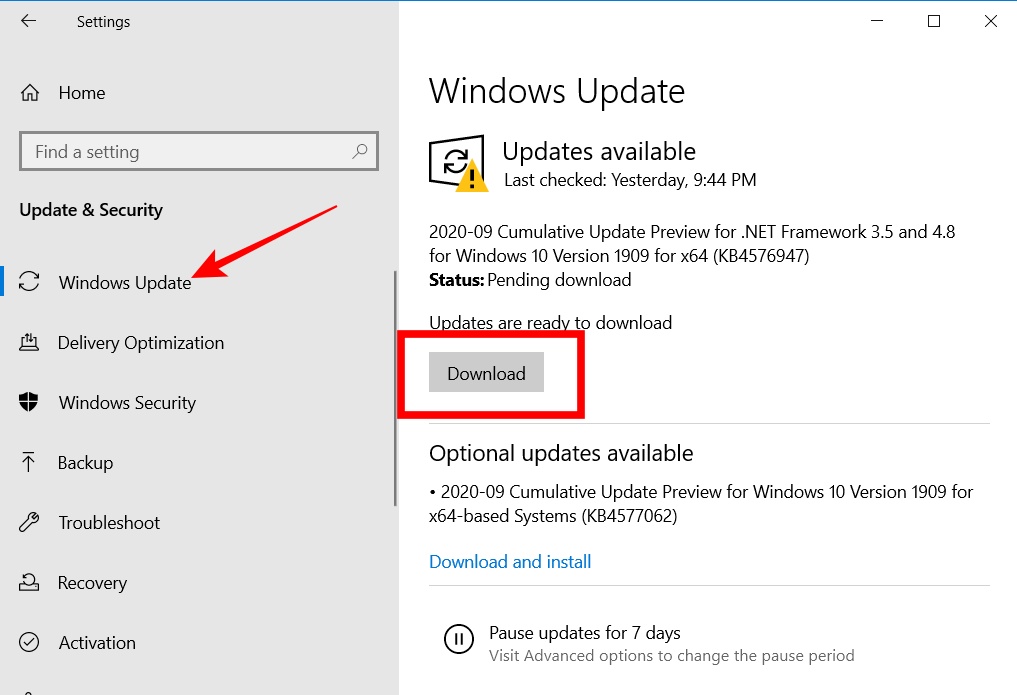
4– If there is any update, you’ll be notified and you can choose to install the update now or later if you are doing some urgent work right now.
After the installation is completed, you may need to restart the PC so that you can do it right away or choose the latter.
Remove SoftwareDistribution Folder
The other fix that worked for many of our readers is the Removing SoftwareDistribution folder.
The SoftwareDistribution folder is a normal folder where all the Windows updates and downloaded files are stored. This folder is specifically related to Windows update installation.
Sometimes, the Windows updates downloaded files get corrupted or overwritten during the downloading process which leads Windows modules installer workers to cause high CPU or Disk usage issues.
You can solve this problem by deleting SoftwareDistribution folder. It will not affect any other operating of your Windows PC.
Here is how to do it.
Step:1– Go to C:\Windows. Choose the same drive where the Windows operating system is installed (if you have the OS installed to some other drive than C).
Step:2– Scroll down to find “SoftwareDistribution‘ folder in the list.
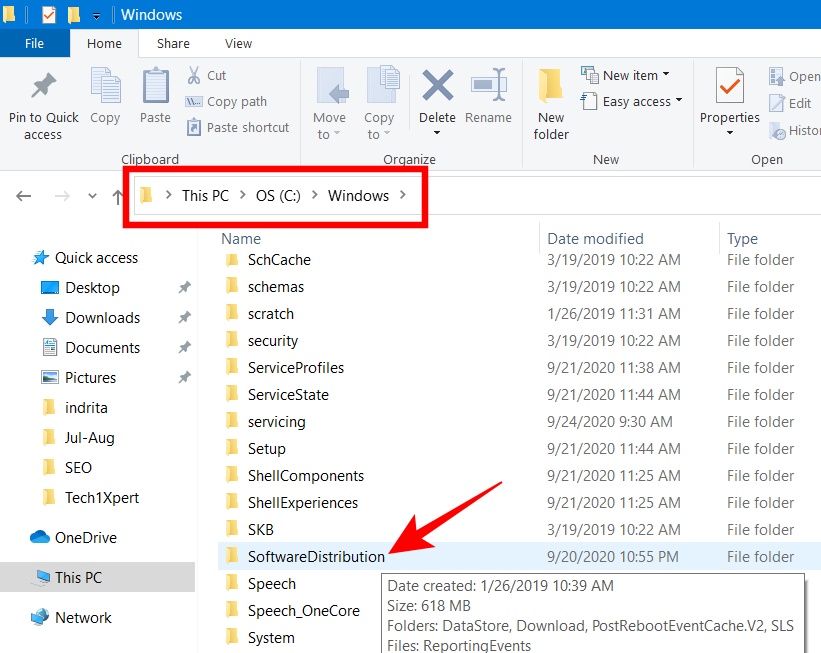
Step:3– Right Click the folder and select Delete or you can press the delete button to get rid of this folder.
Alternatively, you can rename the folder as well, for example, SoftwareDistribution(old).
Done.
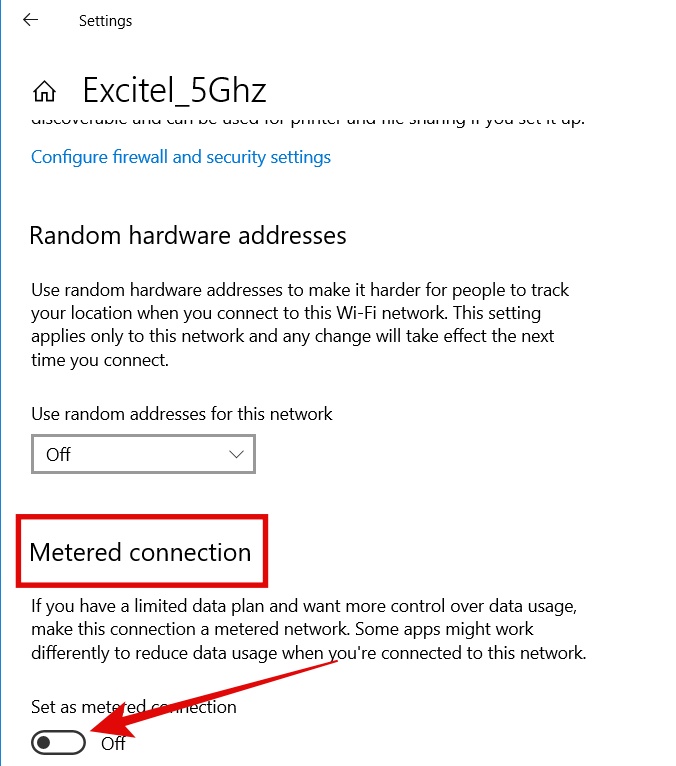
Set Internet connection to Metered connection
There are two ways of doing it. One is through Wi-Fi connection properties and the other one is through Ethernet networks.
Wi-Fi Connection-
Step:1– Click the Wi-Fi icon on the system tray.
Step:2– Go to the Properties of the Wi-Fi connection you’re connected with.

Step:3– Under the settings, scroll down to find “Metered Connection“.
Step:4– By default this slider button is turned off. Tap on it to turn it on.
You’re done!
Ethernet Network Connection
Step:1– Press Windows + R.
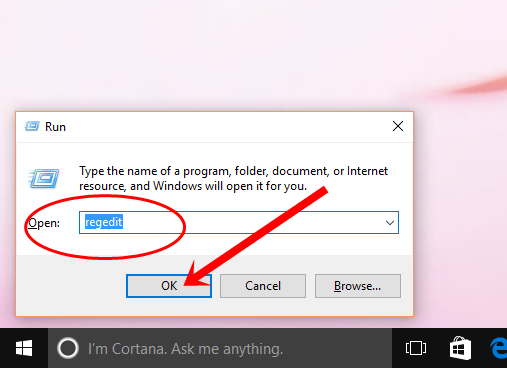
Step:2– Type regedit.
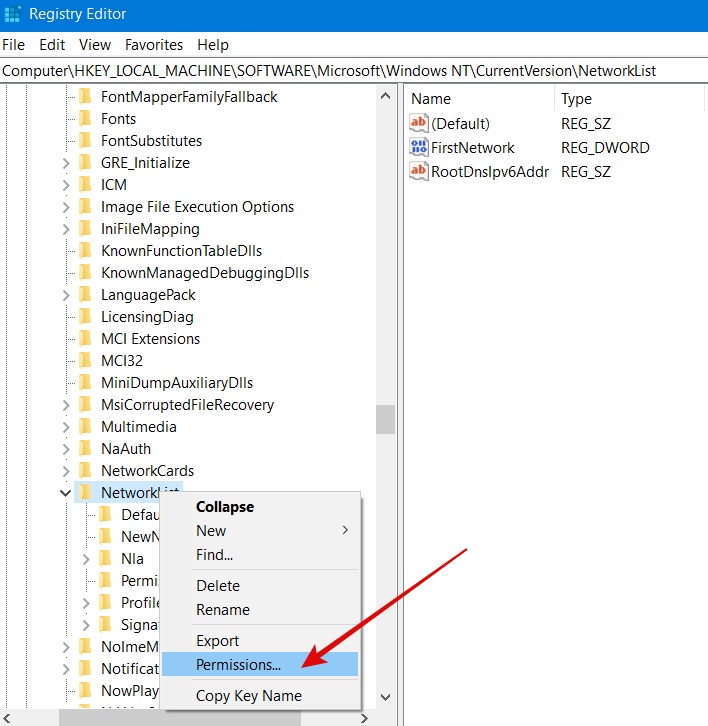
Step:3– Head over to Computer\HKEY_LOCAL_MACHINE\SOFTWARE\Microsoft \Windows NT\ CurrentVersion\NetworkList\DefaultMediaCost
Step:4– Right-click the “Networklist” and select “Permissions“
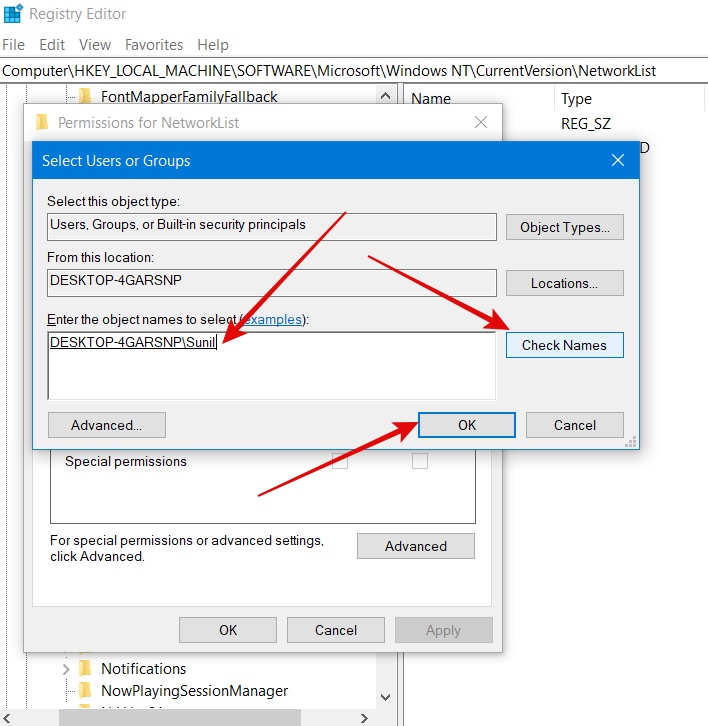
Step:5 – Click “Add“. Type the username and click “Check Names“. You need to enter an appropriate name and if it is available, you are good to go, else you may need to try a few names. Once the username is entered, click Ok.
Step:6– Select the username from the NetworkList and select the checkbox against “Full Control” under “Permissions for ……..” (you will see the username here that you entered in the previous step)

Step:7– Click “Apply” and “Ok“. Restart the PC to check if the problem is fixed.
Check & Fix corrupt files
This method will check your PC for any unknown error and fix it automatically. Basically, it will scan the entire PC for the error and fix it.
The whole process can take a few minutes to complete as it will scan the many files & folders. Here is how to try this method to fix Windows Modules Installer Worker.
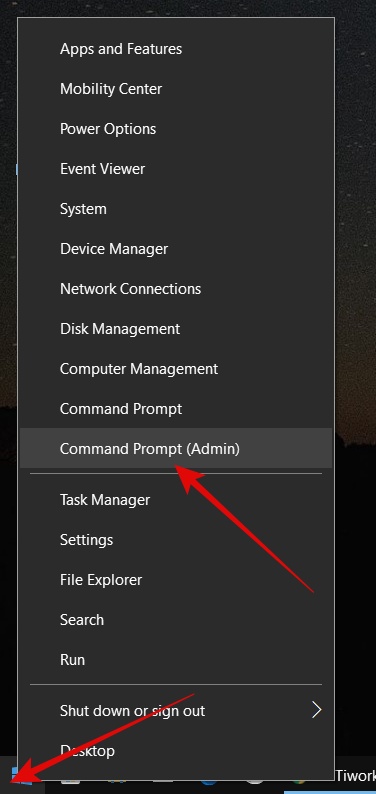
Step:1– Right-click the Windows logo from Start Menu and select Command Prompt(Admin).
Step:2– You’ll be prompt seeking your permission to start Command Prompt. Click “Yes“.
Step:3– Type: sfc /scannow and hit Enter. Allow the process to complete. It can take several minutes to complete the process.
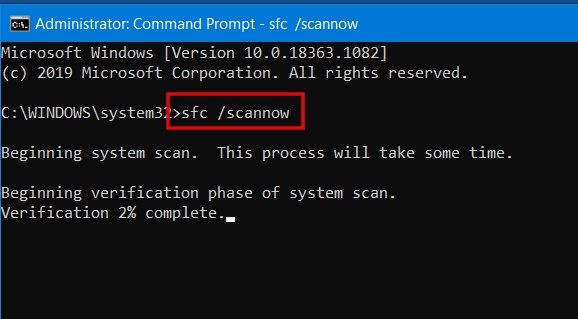
Step:4– Restart the PC when the process is completed and check if the issue is resolved.
Terminate TiWorker.exe Process
If you are looking for a temporary solution, you try this method. This method is really helpful if you are in the middle of some urgent work and your PC is stuck as the Windows update process is running in the background.
We know that when the Windows modules installer worker service is on, we notice a high CPU and disk Usage issue that freezes down the PC.
You can temporarily get rid of this issue by terminating the TiWorker.exe process from Task Manager.
Follow these steps!
Step:1– Press ALT+CTRL+DEL simultaneously.
Step:2– Go to the “Processes” Tab.
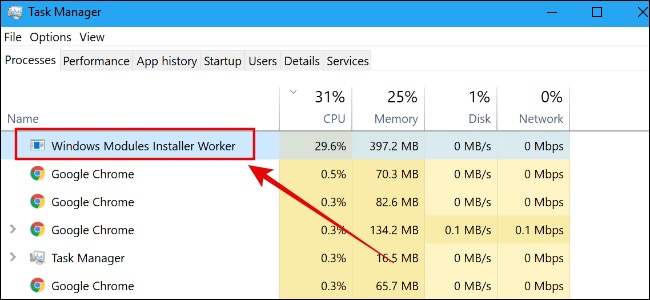
Step:3– Select “Windows Modules Installer Worker” and click the “End Task” now button at the bottom right. It will terminate the process.
Note: Some people may see “TiWorker.exe” instead of Windows Modules Installer Worker.
Why TiWorker.exe is using so much CPU?
It has been discussed many times in this article that the Windows Modules Installer Worker is responsible for constantly looking for new updates that Microsoft releases from time to time, its installation, modification, and removal.
Since the process is always on, you can notice high CPU usage quite frequently which diminishes the performance of your PC.
By default, your PC is set to download and install updates at night but since most of the time, our PC at night is shut down, the updates have to be downloaded when your PC is on which is mostly in the daytime.
Is it Malware and should you be worried about it?
TiWorkers.exe or Windows modules installer is not malware. It is an integrated part of the Windows operating system that executes whenever your PC looks for windows updates and when it installs the updates.
This process keeps on checking your PC for the latest windows update and installs as soon as Microsoft releases the same. It also helps in the removal of Windows updates.
During this court of checking, modifying, installing, and uninstalling updates, your PC may see a surge in CPU usage.
You can continue using the PC while this process is running in the background.
Though, you may sometimes feel some lag as the Windows module installer worker is active.
However, if you have any doubt that the Windows modules installer is not causing high CPU usage, you can scan the PC with your preferred antivirus that you’ve installed on your PC.