Windows 10 was a completely revolutionary operating system, and it entirely changed the ways in which Microsoft used to handle various elements of the OS.
Table of Contents
Starting from supporting the newest of hardware while still keeping the legacy of the past, Windows 10 is truly an OS built for everyone.
But, again, there are some features in the OS that dates back to the pre-XP built.
Some of such features include the Windows SuperFetch, which have been around for a while now.
The idea behind this article is to make you aware of what exactly is Windows SuperFetch?
What are the problems associated with the same and so how to fix them if anything goes wrong?
What Exactly is Service Host and Service Host SuperFetch?
Breaking it down into two different parts:
Service Host
Service Host, which goes by the name Svchost.exe is one of the generic host processes that tend to run like that of the dynamic-link libraries.
For a very long time, Microsoft used to run these Windows functionality from the exe files which has now been changed into the DLL file format.
One of the biggest advantages of using DLL files is that it is easier to maintain and update as per requirement.
On the other hand, they can’t be executed the same way one would run the EXE file format.
To execute DLL files, a shell needs to be loaded. This is where the Service Host file came into existence.
Service Host SuperFetch
SuperFetch has been one of the integral parts of Windows Vista, and OS builds after that.
This particular service allows the Windows Operating System to manage the random memory so that one can run the apps efficiently.
It is also helpful in executing common tasks from the Windows and other third-party apps quickly.
One of the most significant features of SuperFetch is that instead of resorting to the HDD, it reads the data directly from the RAM.
SuperFetch copies all the commonly used files directly to the RAM so that it can load faster.
On the other hand, if you are don’t have the latest hardware, your system is going to have a hard time resulting in higher disk usage.
With Windows 10 being the most commonly used Operating System, one can find that their system is taking much of the CPU and RAM than anticipated.
In the next section, you will get to know what are the different ways in which Service Host SuperFetch can go wrong.
How can Service Host SuperFetch Work Against Your System?
No Operating System is perfect on its own and the same geos for Windows 10.
With every new update, while the developers tend to solve a particular issue, it raises some other problems.
The same goes for Service Host SuperFetch which can occasionally go wrong and wreak more havoc then it was supposed to fix.
One of the biggest drawbacks of SuperFetch is that it always runs in the background, taking some of the resources from the CPU and RAM.
So, if your system is heavily optimized or you are running old or weak hardware, chances are your system can slowdown.
One of the most common problems with SuperFetch is that it preloads a ton of files which tends to increase the booting time of Windows.
Some users have even reported that it tends to force the hard disk to lad applications even before letting Windows to start the necessary services.
As a result, SuperFetch ends up creating more damage to the system instead of saving it.
Systems having 4GB of RAM or less are more affected by this counter-intuitive approach of System Host SuperFetch as compared to others.
Disabling the Service Host SuperFetch
If you are looking forward to optimizing your system, one of the best ways to do so is by disabling the Service Host SuperFetch.
Mainly the disabling option is recommended for those users who are getting occasional spikes in the CPU and RAM usage.
With this option, you can temporarily disable them so that you can at least clear up some space when required.
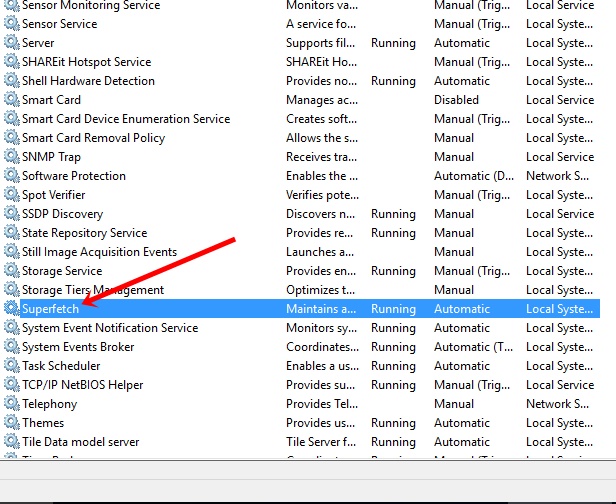
Disabling in Windows Services
STEP 1
Get the Run box by pressing the Windows + R button alternatively. Now, when the search box pops up, look for services.msc and hit enter.
STEP 2
Within the services, option make sure to look for SuperFetch. Once you get that, right-click on the option and select properties.
Then click on the Stop option and select Ðisabled from the start-up type. This should disable the SuperFetch.
Disabling from Command Prompt
STEP 1
Click on the start menu and search for the Command Prompt. Make sure to right-click on it and then Run as administrator.
STEP 2
Once the Command Prompt pops up, make sure to type net.exe stop Superfetch and hit enter. Type as it is, we have described.
STEP 3
If this command doesn’t stop the SuperFetch or shows that the command is not valid, use the command net.exe stop sysmain.
In order to check if the SuperFetch has been disabled or not, look for the same program in the Task Manager. Fun fact!
If the service is disabled, you will instantly notice a slightly faster speed for your computer.
Now give a quick reboot to the computer, and that shall disable the service for the greater good.
Disabling through Windows Registry
There is just a plethora of options through which you can disable the SuperFetch service.
Apart from using Command Prompt and Windows Services, you can also disable it through the Windows Registry. In order to do it, make sure to follow these steps:
STEP 1
As earlier press the Windows + R button to open the Run box. Once the search box appears, look for Regedit and hit enter.
STEP 2
Once the Registry Editor window opens, navigate to the following path.
HKEY_LOCAL_MACHINE>SYSTEM>CurrentControlSet>Control>Session Manager>MemoryManagement>PrefetchParameters
STEP 3
Head over to the Enabled Superfetch option and change the value of the same to 0 to disabled it. Once that is done, hit enter.
Make sure to close the Registry Editor Windows and restart your computer.
The next time it boots up, you will find the Service Host SuperFetch disabled.
Fixing High Disk Usage Through Troubleshooting
Apart from disabling the SuperFetch service, you can also diagnose it with the help of Troubleshooting option in Windows.
This is a very good way to figure out whether the slowdown of your system is due to the SuperFetch or something else.
Afterall, you are always innocent until proven guilty.
STEP 1
Head over to the Windows Start menu and look for Control Panel.
STEP 2
Within the view option, choose view from Category and head over to the System and Security.
STEP 3
Click on the Security and Maintenance option and then Troubleshooting.
STEP 4
Select the Fix Problems with Windows Update option and head next.
STEP 5
Select the Try troubleshooting as an administrator option and let Windows do its job. If SuperFetch is the problem behind it, Windows will resolve the problem on its own.
Is it Safe to Disable Service Host SuperFetch?
It is quite understandable after going through the article; it might occur, is it even safe to disable the service?
The answer to this is pretty simple.
YES! You can disable the service, and it would affect or break your system. Afterall Service Host SuperFetch is just a memory management process.
So, if you find that instead of supporting your OS to keep the memory usage minimal, it works on the other way, you can surely disable the SuperFetch.
The only difference you will find the with the SuperFetch disabled, it would just take the normal files to load a little bit slower than usual.
Which Windows Version Supports SuperFetch?
As stated earlier, Service Host SuperFetch has been around since Windows Vista.
That means if your system is running with the same operating system or higher, there is Service Host SuperFetch in your computer.
But, make sure to understand that only disable the SuperFetch as a last resort.
If you are running older hardware with a newer version of Windows, chances are you are going to feel your system working slower than before.
Apart from disabling the SuperFetch option, you can also resort to updating your hardware or making subtle changes to them.
For instance, you can add some extra RAM, so that windows could run smoothly or just change the HDD to a SATA SSD.
If you have an M.2 slot, you can also use the faster NVME SSDs. In this way, you don’t have to disable the system and make your Windows run faster than ever.
Conclusion
We believe that through all the tips and tricks mentioned above, you can fix the Service Host SuperFetch error.
This can help you to optimize your computer so that you can use it with maximum performance.
Just make sure to go through all the steps so that, if one of them fails to fix the error you can head over to the next one.