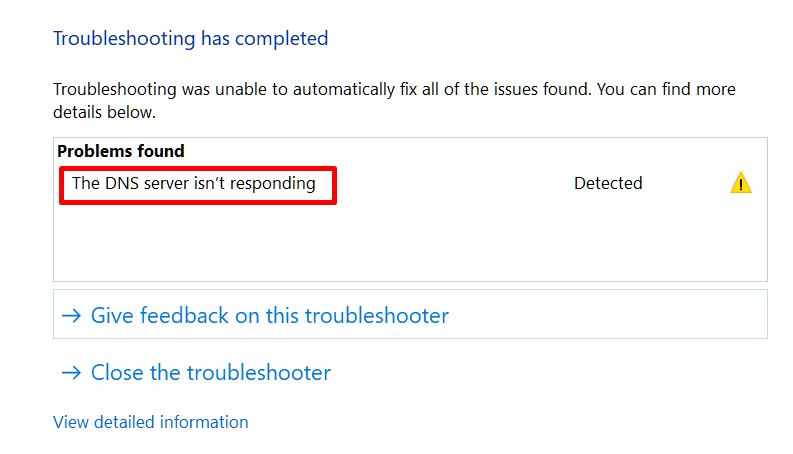
Whenever your browser is unable to establish an internet connection, you will get the DNS server not responding to Windows 10 messages through the Windows Troubleshooting Program.
Table of Contents
There are several reasons why this message popped up in the first place, but there is nothing to worry about it.
While following through with some of the easy steps, you can always get your internet up and running in no time.
The idea behind this article is to make you aware of what exactly is a DNS server?
Why the problem arises in the first place?
And how to fix the problem? Without wasting any further time, let’s dive into the topic.
What is a DNS Server?
The term DNS stands for Domain Name System. It is nothing but a recording directory for the internet, similar to that found in the phonebook.
The DNS server is mainly used to associate a domain name with that of an IP address so that users can remember the name of the website.
After all it is easier to remember the name of a website instead of typing numbers in the browser to access them.
When your DNS server stops responding, it means you can’t access your favorite website on the internet.
Fixing the Problem
Here is a list of some of the ways in which you can fix the DNS server isn’t responding problem in your computer:
1) Restarting Everything
What we mean by that is, sometimes giving a quick reboot to your computer along with the modem and router can fix the problem you are currently facing.
How does it work?
Actually, there is no supporting fact to it. But there are several instances where the temp files in the operating system can become corrupt, which in turn can cause such issues.

Make sure to do it initially; chances are your problem can be solved by this step only.
2) Changing the DNS Server Manually
While accessing a certain website, you are automatically connected with the ISP’s DNS server.
Sometimes the DNS server is not available, in which case you can easily change it to OpenDNS or Google DNS.
In order to do that, make sure to follow these steps:
- Press the Windows + X key and open the network connection.
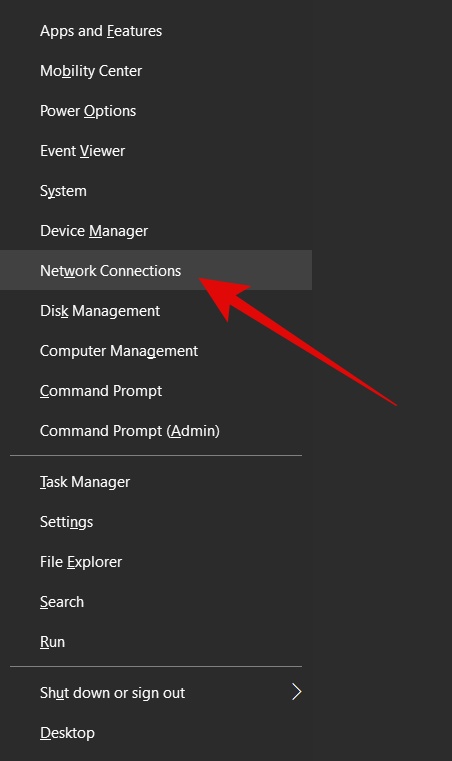
- Make sure to locate your network and head down to the Properties option.
- When the properties windows show up, select the Internet Protocol Version 4 (TCP/IPv4). Use 8.8.8.8 as your Preferred DNS server and 8.8.4.4 as the Alternate DNS server.
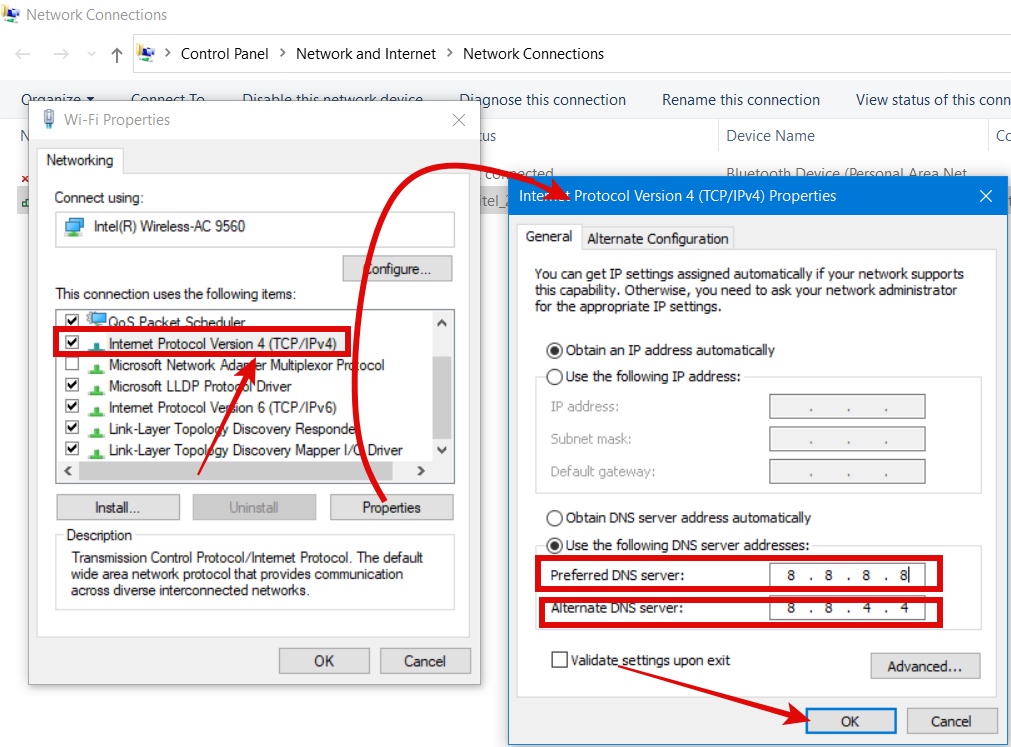
- Once you are done, click on OK to save the changes.
3) Installing the Latest Drivers
It is very important to understand that your network adapter mainly relies upon the drivers to work properly.
So, if you are encountering any network issues, chances are it could be due to an outdated driver.
If you are having internet connectivity issues throughout your PC, download the drivers elsewhere and install them on your computer.
Another thing, make sure to uninstaller your network drivers before you install the newer versions. This shall do the trick.
4) Entering the MAC address manually
If anything goes wrong, you can always start over, and the same goes for the DNS server too.
Sometimes you can fix the DNS server failure just by typing the MAC address manually.
It is very simple, and you can make these changes in the following ways:
- Press the Windows + X key and choose the Command Prompt (Admin) option from the menu.
- Once the command window opens, type the command ipconfig/all and hit enter.
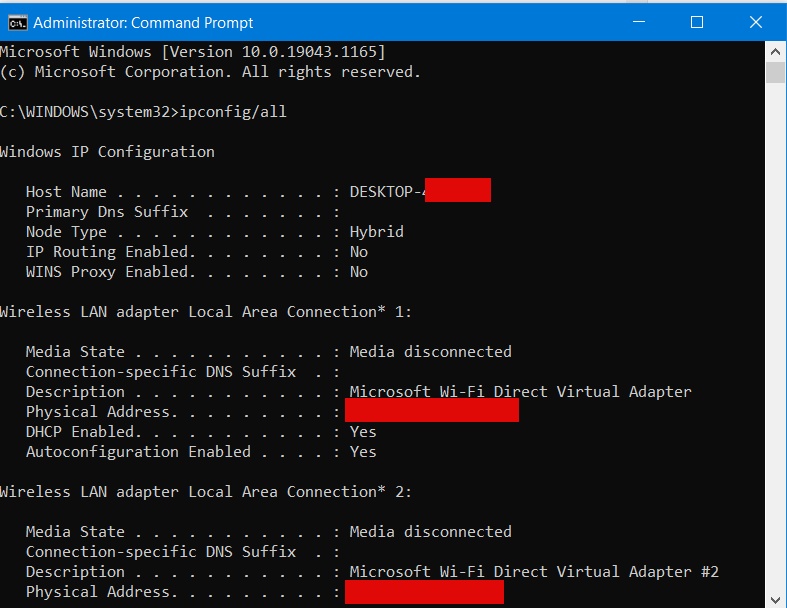
- Look for the Physical Address and write it down for later use.
- Open the Network Connection window, head over to the Properties, and click on Configure.
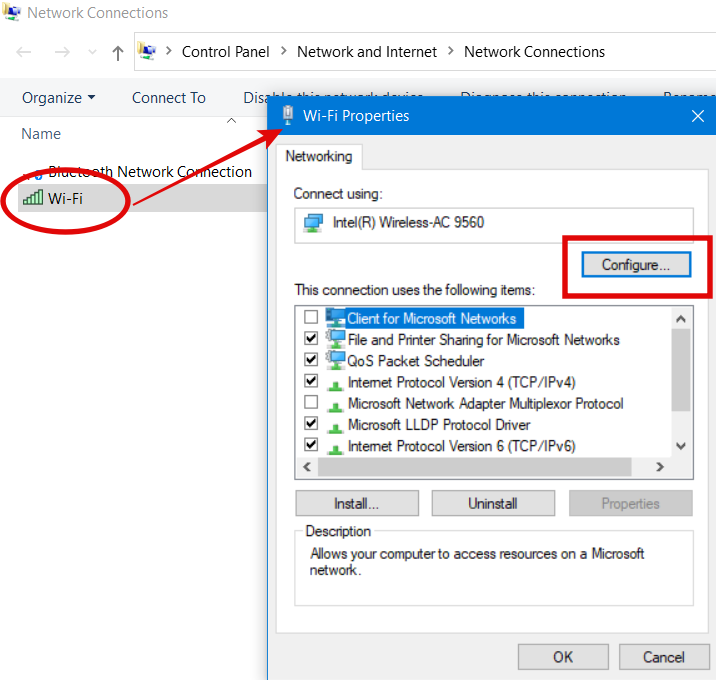
- In the Advanced tab, you will find the Network Address.
- Enter the address you wrote from the command window and hit OK.
This particular option works best while switching from one DNS server to another one, as stated in point number 2.
5) Disabling the Firewall and Antivirus
Do you know that sometimes your firewall and antivirus can interfere with your internet connection?
Certainly, they are necessary to protect your computer from viruses and malware, but they can be overprotective at times.
Mainly affecting the Windows 10 users, if you are getting the DNS server not responding message, make sure to disable both the antivirus and firewall and try again later.
Remember, there is no need to worry as the Windows Defender will protect you at times like these.
Now, if you get your internet connection back, then it was probably due to the wrong configuration in the firewall or antivirus. You can even try to change the vendor for that matter.
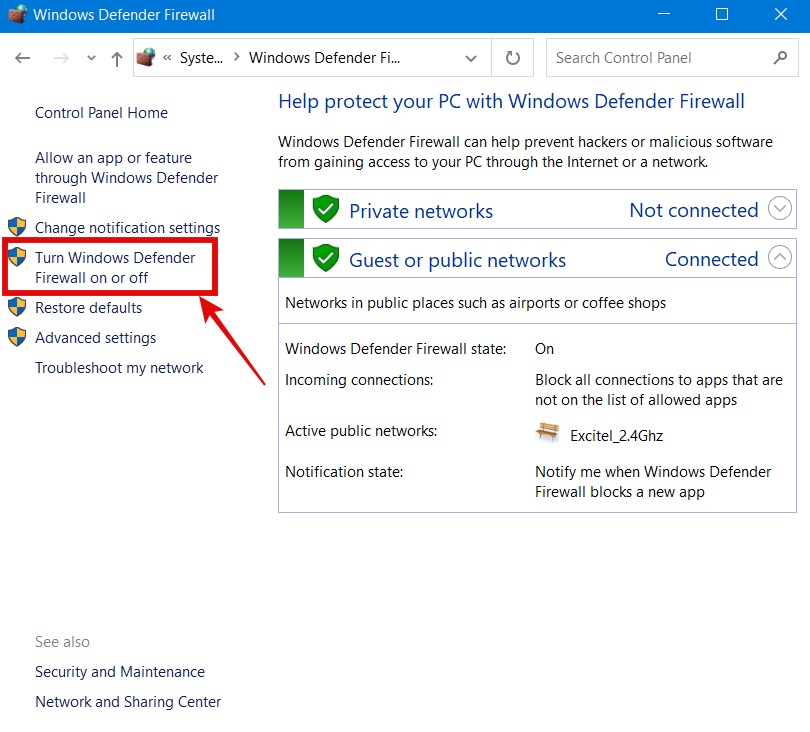
1- Go to Control Panel
2- Select Windows Defender Firewall.
3- Disable Firewall.
6) Updating the Router’s Firmware
One of the most common instances, where the DNS server doesn’t respond, is when you are connected with the wireless network.
You can fix this just by updating your router’s firmware.
Make sure to understand that it is a bit of an advanced process and it should only be performed as a last resort if nothing else works.
Make sure to back up your router’s settings before you opt for updating your router’s firmware.
We won’t be covering the entire firmware updating process as it varies from one model to another.
Make a quick Google search for your particular model, and you will find the process.
Again, it only for advanced users and only proceed with such if you know what you are doing.
7) Using the netsh command
Instead of going too much into the details of it, make sure to know that just by typing these few commands in the Command Prompt Window, you can fix the DNS failure. Follow the steps down below:
- Open the Command Prompt as Administrator.
- Type the following commands:
netsh int ip reset
netsh winsock reset
ipconfig/ flushdns
imconfig/ renew
Once you have executed the following commands one by one, reset your computer.
Before performing this command, make sure to keep a note of your IP address as it will reset them along with clearing the DNS cache.
8) Starting Your Computer in Safe Mode
Antivirus and firewall, along with other third-party applications such as VPN, can always interfere with your internet connection.
Especially such problems are encountered on PC running in Windows 10. If that is the case, try to start your computer in Safe Mode and access the internet.
In order to start in Safe Mode, go through the following steps:
- After opening the START Menu, hit on the Power button and click on the Restart option while holding the shift button.
- Under all the different options, select the Troubleshoot menu.
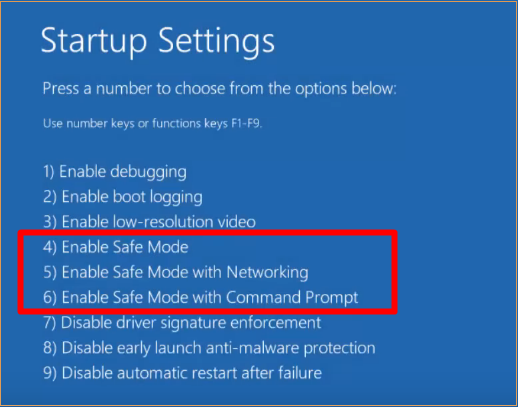
- Head over to the Advanced options, then to the Startup Settings, and select the Restart button.
- When your computer restarts, select the option with Safe Mode with Networking.
- Now your Windows will boot in Safe Mode.
If you see that the problem doesn’t persist in the Safe Mode, then the third-party software is interfering with your network connection.
Make sure to remove the software and start your Windows normally.
9) Disabling the Microsoft Virtual Wi-Fi Miniport Adapter
Again, if you are facing a DNS server issue while connecting with Wi-Fi, the problem might arise from the Microsoft Virtual Wi-Fi Miniport Adapter.
You can fix this problem in the following ways:
- Open the Device Manager and head over to the View option to select the Show hidden devices.
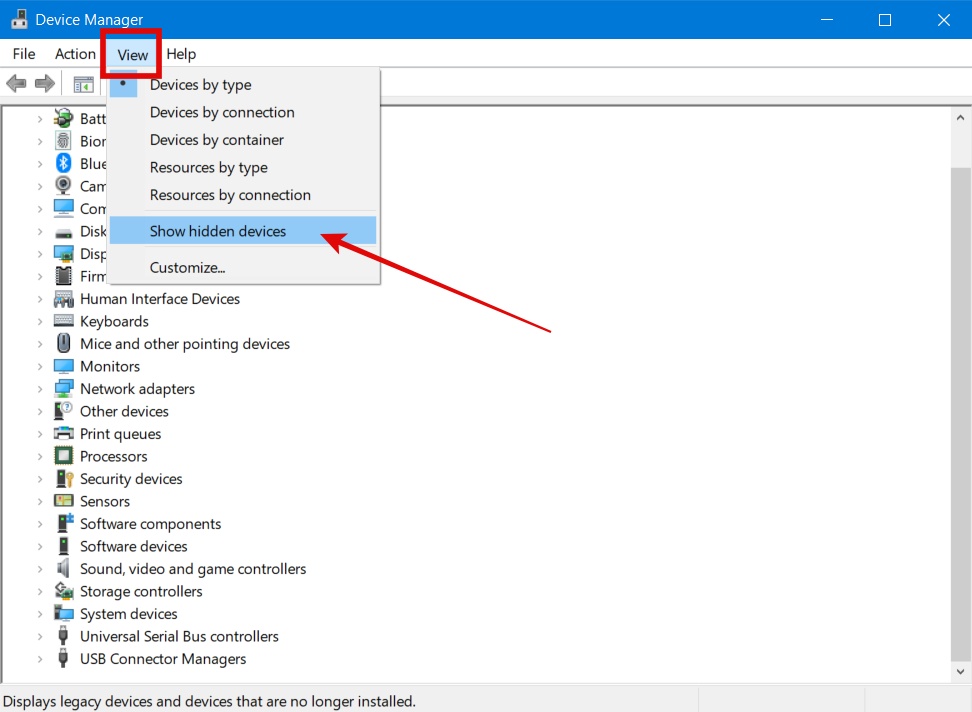
- Over there, you will find the Microsoft Virtual Miniport Adapter, right-click on it to Disable. Repeat the same process for all the available Virtual Miniport Adapters.
- Once you are done with it, close the Device Manager, and check if the issue is resolved or not.
10) Disabling Internet Protocol Version 6
As you know, there are two types of IP addresses available, namely v4 and v6.
Another way to fix the DNS server problem is by disabling the IPV6. It is very simple, and you can perform the same by following these steps:
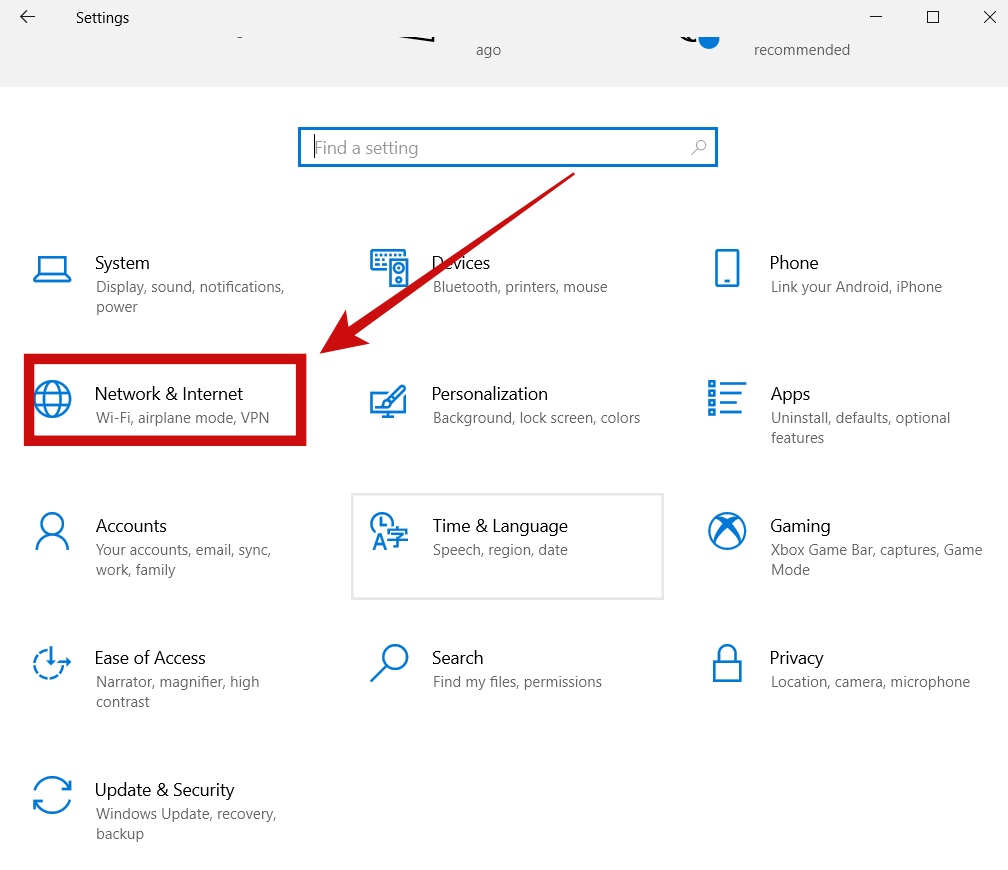
1- Open the Network Connection Windows.
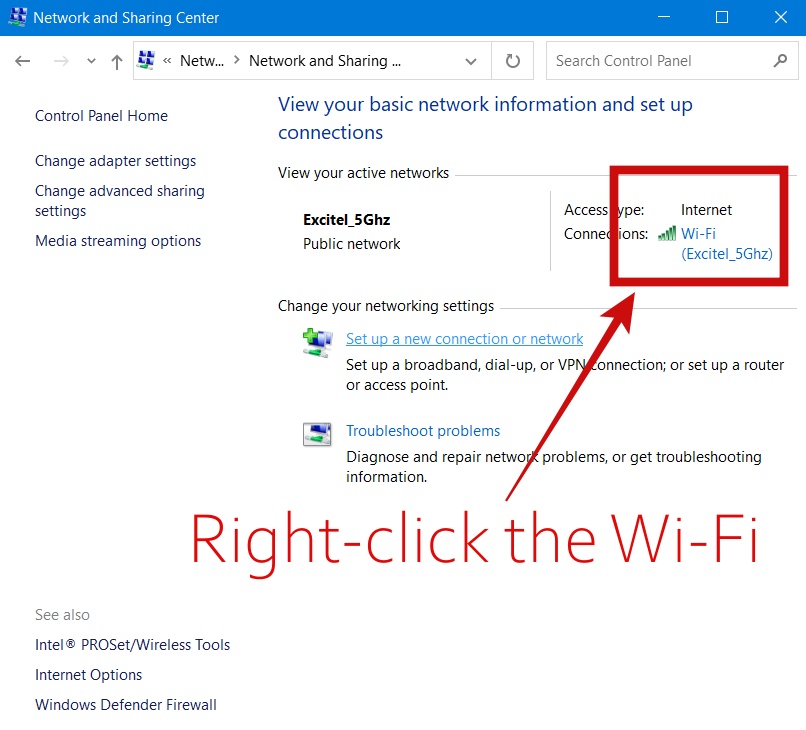
2- Right-click on the connection and select the Properties.
3- Now head over to the Internet Protocol Version 6 (TCP/IPv6) and uncheck the square box in front of TCP/IPv6 network.
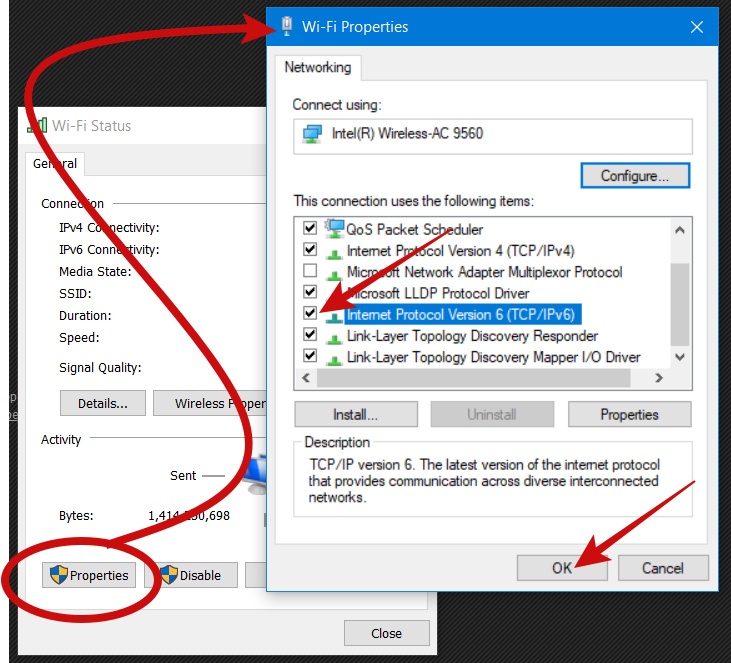
4- Hit OK to save the changes.
One of the best things about this process is that it won’t affect your computer in any adverse way while fixing your problem.
11) Disabling all Additional Connections
If you are having multiple internet connections available on your PC, it can also a DNS server error.
You can fix that problem by disabling all the connections apart from the active one.
All you need to do is head over to the Network Connections windows and make necessary changes from there.
Also see: Fix ERR_CACHE MISS (Confirm Form Resubmission)
Final Takeaway
With all the above-mentioned tips and tricks, you are bound to get the possible solution for the problem.
Sometimes all you need to is a few tweaks in the settings, and you are good to go.
But if still the issue persists, make sure to let us know in the comment section below.